
Use grid and guide lines to help accurately align or size embroidery objects. The grid can be turned on or off and grid spacing changed as preferred.
In addition a ruler can be turned on or off for accurate measuring. The zero point of the ruler can be set to any point on the design or design window. The ruler scale depends on the zoom setting.
Together with the ruler, guides can be placed across the design window to help align objects. Each guide has a yellow handle on the ruler to move or delete it. Guides are displayed on top of the grid, if present, but ‘beneath’ design objects. Rulers must be displayed before a guide can be set.
Note that the unit of measurement – mm or inches – depends on the regional settings in the Windows Control Panel. They can be changed from within the software. See also Measurement units.
 | Click View > Show Grid to show or hide grid. Right-click for settings. |
 | Click View > Show Rulers & Guides to show or hide rulers and guides. Right-click for settings. |
Display rulers & guides
Turn on grids and rulers via the View toolbar.

Alternatively, right-click a blank part of the design window to invoke the popup menu.

- Reset the ruler zero point by clicking and dragging the box in the top left-hand corner to a point on the design. This becomes the new zero point – X,Y (0,0). The grid always aligns with the rulers.
- To create a guide, click on either ruler – horizontal or vertical – and click-and-drag into position. Multiple guides can be created and just as easily removed.
- For more accurate positioning, double-click the yellow guide handle. In the Guide Position dialog, enter a precise distance from the zero point, and click OK.
- To remove a guide, drag the yellow guide handle off the design window.
| Click View > Show Grid to show or hide grid. Right-click for settings. |
| Click View > Show Rulers & Guides to show or hide rulers and guides. Right-click for settings. |
Adjust grid & guide settings
- Select Software Settings > User Interface Settings. Alternatively, right-click the Grid or Ruler tools on the View toolbar.
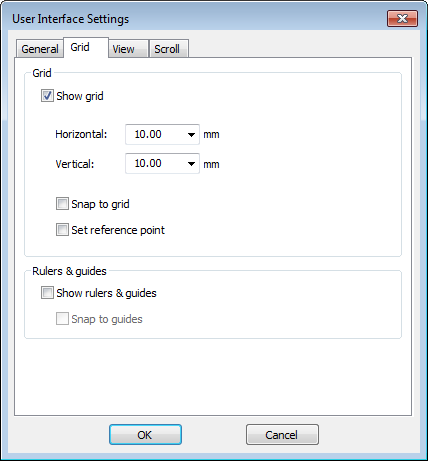
- Adjust grid spacing in both horizontal and vertical directions. Sometimes you might want to set it for precise design work such as cross stitch.
- Snap to Grid and Snap to Guides settings as available. Reference points, control points or leading edges of objects snap to the grid during digitizing, sizing, reshaping, or positioning operations.
 | Use Context > Measurement Units to change measurement units within software without having to change system settings. |
Measure distances on screen
Measure the distance between two points on screen using the Measure tool. Measurements are shown in millimeters or inches, depending on current settings. See also Measurement units.
- Select View > Measure Tool or press <M>.
- Click the start point and drag the mouse. The tooltip displays the length of the measured line. The angle shown is the angle of the measured line relative to the horizontal.

- Press <Esc> to finish.
- You can also check the width and height of your design in the status bar.
Comments