Create stumpwork
 Cutwork becomes stumpwork when you combine multiple cutwork elements into a layered design. In essence stumpwork is the finished layered embroidery made up of cutwork components. Thus the process of creating a stumpwork design involves digitizing cutwork elements and then creating stumpwork pieces from them. These are then visualized in a single stumpwork design.
Digitizing with wire and fabric is probably the most common scenario for creating stumpwork. It involves digitizing a simple stumpwork border. This is then sewn onto a separate piece of fabric, usually patterned, with the inclusion of a wire, and then cut out and attached to a base design. Another simple scenario involves creating design elements within a closed border without the inclusion of a wire. The software also allows you to digitize stumpwork after the fact. You can generate cutting elements from existing embroidery shapes with or without a wireline.
.
Create stumpwork from existing embroidery
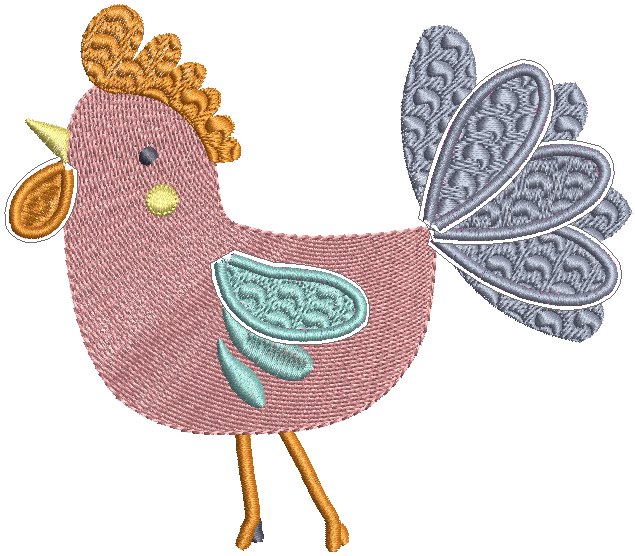
Probably the simplest way to create stumpwork is to take an existing design and adapt it. This scenario involves selecting embroidery shapes from which to generate the mandatory cutting element. This usually includes a wireline but doesn’t have to. The resulting stumpwork is sewn separately with wire and border. It is then cut out and sewn or attached to the base design.
- To create a stumpwork design from existing embroidery, open a suitable design. You may have to adapt or re-digitize embroidery objects as necessary.
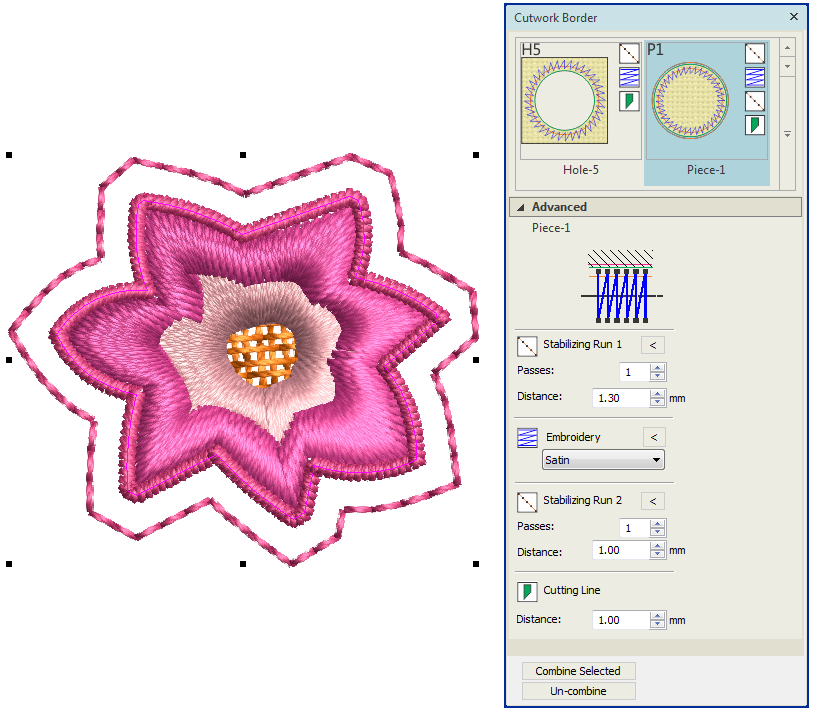
 | Use Cutwork / Stumpwork > Digitize Cutwork Border to create cutwork objects with up to five layers of embroidery and cutting components, including stabilizing runs, tackdown runs, cuts, embroidery, and net fills. |
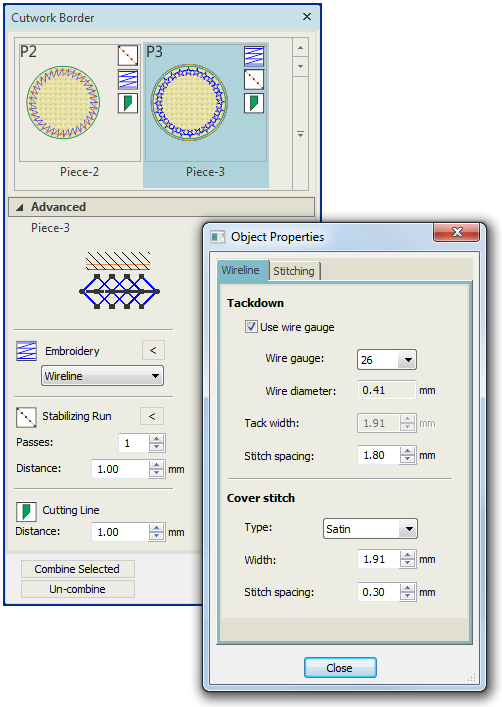
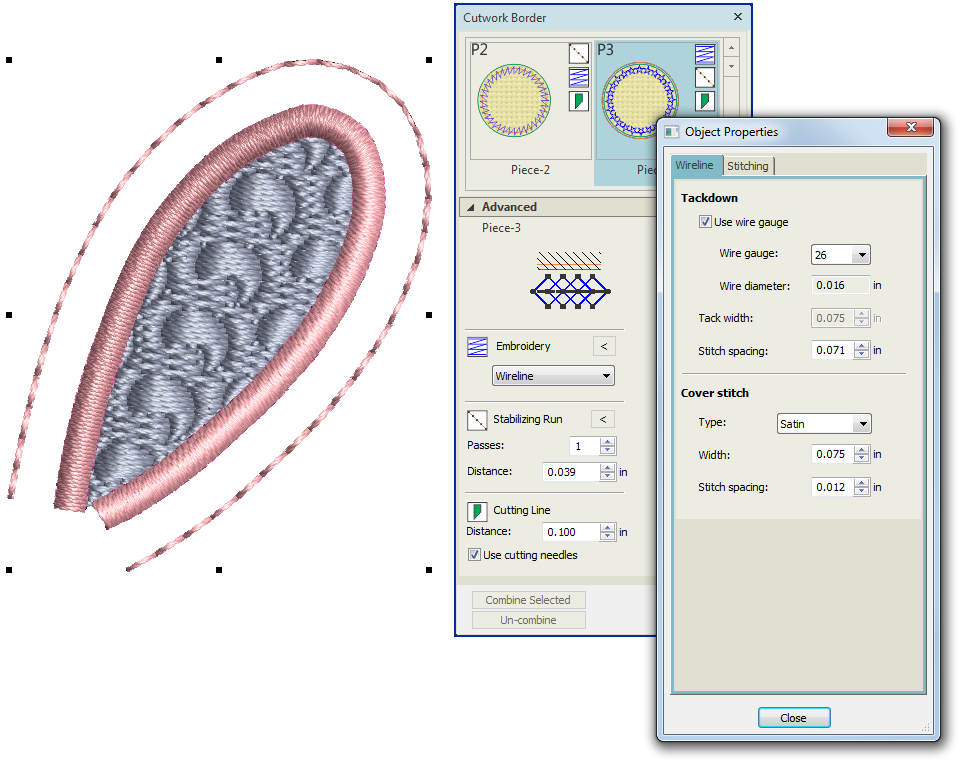
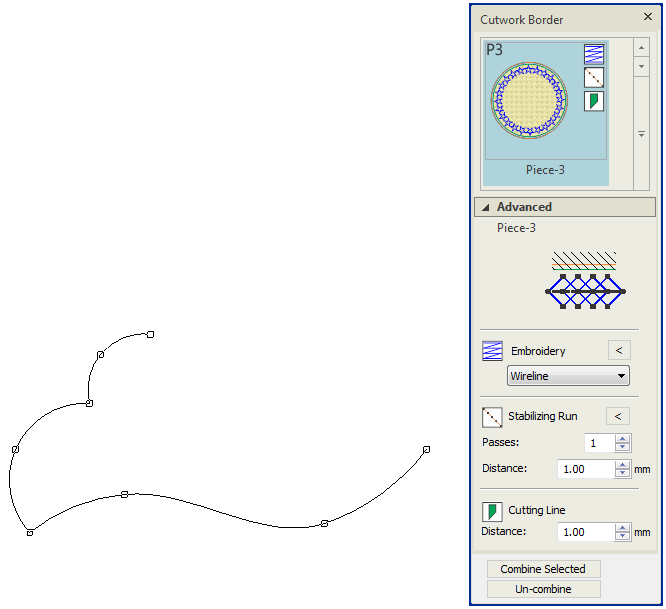
Right-click the Digitize Cutwork tool to open the Cutwork Border docker. Preset your preferences. For example, choose 'Piece-3' and select 'Wireline' as your embroidery.
Click the associated < arrow button and preset your wireline preferences. The wire gauge numbers correspond to the American Wire Gauge (AWG) codes. This is a standardized wire gauge system for the diameters of round, solid, nonferrous, electrically conducting wire. The larger the AWG number or wire guage, the smaller the physical size of the wire.
The thickness of the wire, in turn, determines the minimum width of cover stitch required. This does not update dynamically according to the selected wire gauge. Adjust the cover stitch width as preferred.
 | Use Cutwork / Stumpwork > Add Cutwork Border to generate a cutwork / stumpwork border from selected objects which may consist of embroidery border, cutting line, and one or more stabilizing runs. |
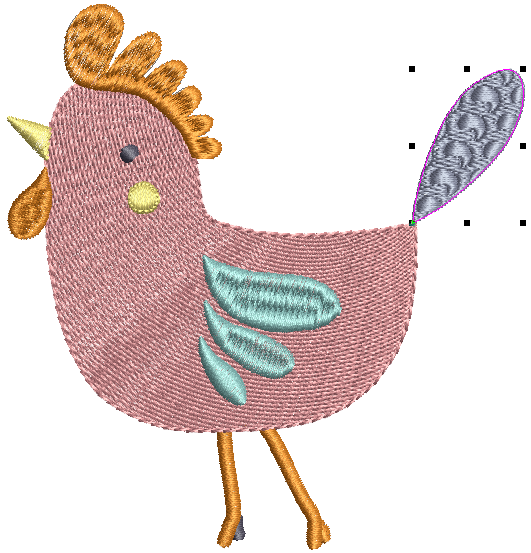
Select the object or objects you want to turn into stumpwork. In this case, we are using a single object.
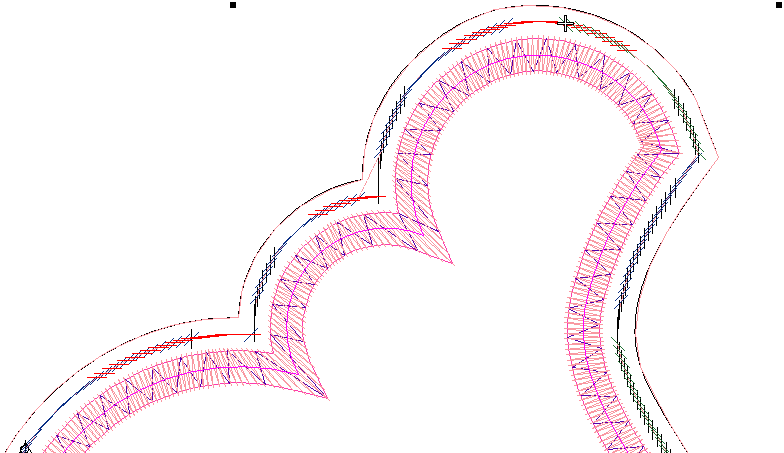
Click Add Cutwork Border to create the cutting element. The Add Cutwork Border dialog opens. The settings are predefined by the Cutwork Border docker but this dialog allows you to choose border type. If your selected object contains holes, you can also set a border type or simple cutting line for those as well. In this case, the object does not contain holes so the option is unticked.
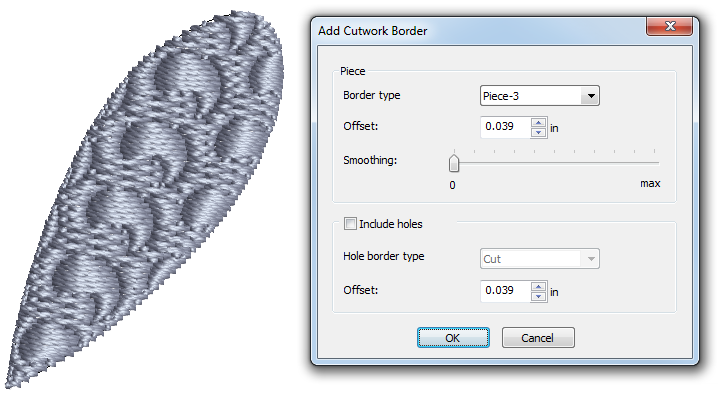
Use the offset settings to adjust border offset from the source object/s. You can also adjust smoothing to determine how closely the border follows the source object/s.
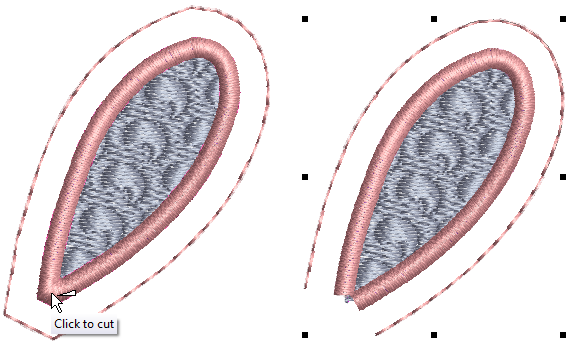
 | Use Cutwork / Stumpwork > Cut Closed Cutwork Border to cut a closed cutwork / stumpwork border to leave an opening for wire ends. |
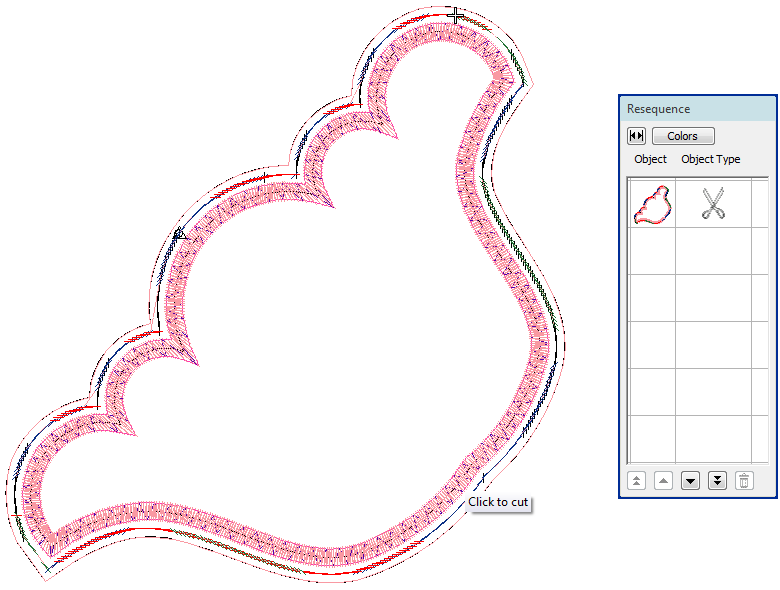
- You are prompted to mark a cutting point where the wire ends will protrude. All selected objects are automatically grouped.
- You can adjust cutwork settings after the fact by double-clicking the border. Click the associated < arrow button and adjust embroidery or other preferences in the Object Properties dialog.
 | Use Cutwork / Stumpwork > Digitize Wireline to create a wireline with a digitized outline and current settings. |
 | Use Cutwork / Stumpwork > Create Stumpwork Sub-design to create sub-design from selected objects which include embroidery within a stumpwork border. |
- Optionally, use the Digitize Wireline tool to insert additional wirelines for extra support.
- Select the stumpwork border and any other embroidery within that you want to include, and click Create Stumpwork Sub-design.
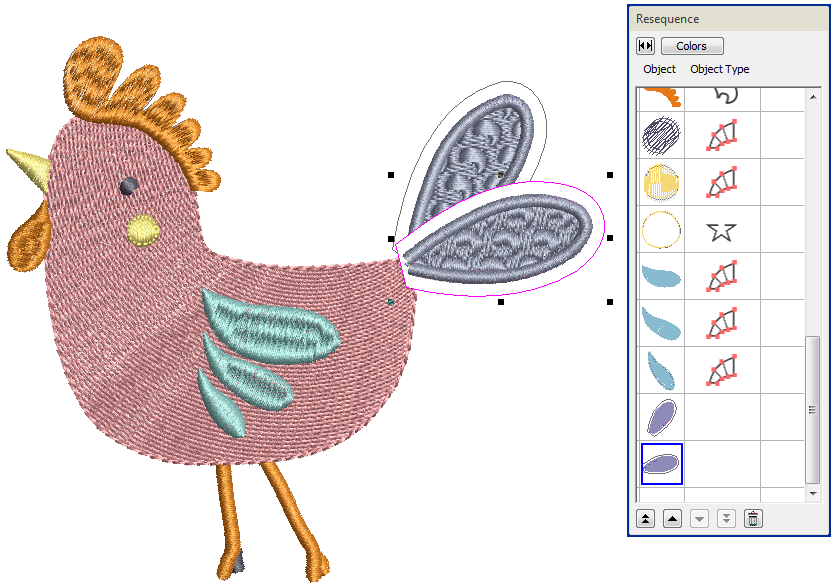
Selected objects are bundled into a sub-design which is embedded in the base design. The stumpwork sub-design appears at the bottom of the Resequence docker because it is a separate design. - Continue to generate other stumpwork objects as desired. Or copy the same one as desired.
Note that if you create multiples of the same stumpwork object, you only need to output one of them as a machine file. This can then be stitched multiple times in a single hooping.
| Use Cutwork / Stumpwork > Digitize Cutwork Border to create cutwork objects with up to five layers of embroidery and cutting components, including stabilizing runs, tackdown runs, cuts, embroidery, and net fills. |
Create stumpwork with a wireline
Digitizing with wire and fabric is probably the commonest scenario for creating stumpwork. It involves digitizing a simple stumpwork border. This is then sewn onto a separate piece of fabric, usually patterned, with the inclusion of a wire, and then cut out and attached to the base design. The Piece-3 border involves embroidery, a stabilizing run, and a cutting line.
- Right-click the Digitize Cutwork tool to open the Cutwork docker. Preset your preferences - e.g. choose 'Piece-3' and select 'Wireline' as your embroidery.
- Digitize the border as you would any other object.
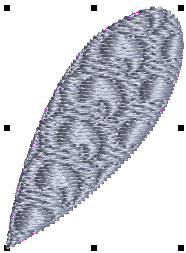
Press <Enter> to complete. A closed cutwork object is generated based on presets. Zoom in for a closer look.
| Use Cutwork / Stumpwork > Cut Closed Cutwork Border to cut a closed cutwork / stumpwork border to leave an opening for wire ends. |
- Use the Cut Closed Cutwork Border tool to cut an opening in the border for your wireline.
| Use Cutwork / Stumpwork > Create Stumpwork Sub-design to create sub-design from selected objects which include embroidery within a stumpwork border. |
Select the border and any other embroidery you want to include and click Create Stumpwork Sub-design. 
 | Use Cutwork / Stumpwork > Open Stumpwork Sub-design to view and edit selected sub-design. |
- Optionally, edit your stumpwork object by selecting and clicking Open Stumpwork Sub-design.
The stumpwork object opens in a separate window where you can edit properties such as wire gauge, satin cover width and offsets, etc. - Optionally, add a background indicative of the fabric you will be using.

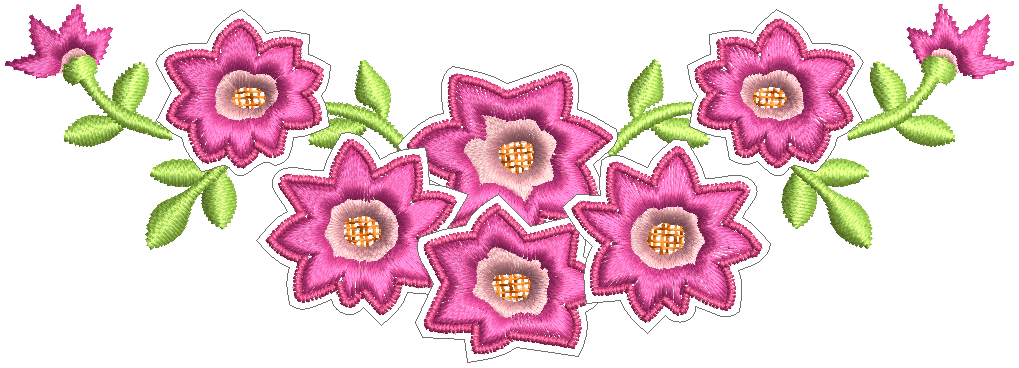
When stitching out stumpwork, it is often easier to glue the wireline in place with fabric glue before attempting to add the cover stitching. Study the Stumpwork_Floral design included in the sample designs folder. Try stitching it out to practice the techniques involved. Check your machine documentation.
.
Create stumpwork with a closed border
Another simple stumpwork scenario involves creating design elements within a closed border. Like open-border stumpwork, these elements, or ‘sub-designs’, are sewn onto a separate piece of fabric, usually patterned, but without the inclusion of a wire. They are then cut out and attached to the base design.
The steps for creating closed stumpwork are essentially the same as for open stumpwork. The difference lies in the selection of embroidery.
- Use your normal embroidery tools to create a design, or take an existing design you want to modify.
- Open the Cutwork docker and preset your preferences – for example, a satin border.
| Use Cutwork / Stumpwork > Digitize Cutwork Border to create cutwork objects with up to five layers of embroidery and cutting components, including stabilizing runs, tackdown runs, cuts, embroidery, and net fills. |
| Use Cutwork / Stumpwork > Add Cutwork Border to generate a cutwork / stumpwork border from selected objects which may consist of embroidery border, cutting line, and one or more stabilizing runs. |
| Use Cutwork / Stumpwork > Create Stumpwork Sub-design to create sub-design from selected objects which include embroidery within a stumpwork border. |
| Use Cutwork / Stumpwork > Open Stumpwork Sub-design to view and edit selected sub-design. |
- Digitize the border or add one to existing objects.
- Select the resulting border and everything else you want included in the stumpwork sub-design, and click Create Stumpwork Sub-design. Selected objects are bundled into a composite object which resides on a separate ‘layer’ to the base design.
- Optionally, edit your stumpwork object by clicking Open Stumpwork Sub-design. The stumpwork object opens in a separate window where you can edit its properties.
- Close the sub-design to return to the base design. You will be prompted to save.
If you later decide to add a wireline to a closed border, you need to first cut an entry point. Use the Cut Closed Cutwork Border tool for this purpose.
.
Study the Stumpwork_Wreath design included in the sample designs folder. Try stitching it out to practice the techniques involved. Check your machine documentation.