
Design colors
You change colors for embroidery objects from the Design Colors toolbar. This is the simplest way to customize a design. Various techniques are available:
- Recoloring object-by-object
- Recoloring entire color blocks
- Picking and applying colors from the design
- Recycling colors within an existing design palette
- Choosing new base colors and cycling the rest
In addition to the Design Colors toolbar, you use the Threads docker to change thread charts and assign threads to the design.
Any changes you make to the Design Colors toolbar are saved with the design file if you save it in EMB format. You can then export to your machine format.
The screen illustrations in this publication are intended as representations, not exact duplicates of screen layouts generated by the software. The samples used to illustrate software features and capabilities may not be exactly duplicable, depending on your product level.
| Use Design Colors > Current Color to view the current design color. |
View color blocks
The Design Colors toolbar offers an easy way to selectively view color blocks and embroidery objects. This is useful when re-coloring. Click and hold a color in the Design Colors toolbar to isolate it in the design workspace.

Another technique for isolating colors in the design workspace is via the Arrange > View by Color command. The dialog allows you to tick the colors you want to view in isolation.

Note that hidden colors are marked in the Sequence docker. Right-click to access the 'unhide' commands from the droplist. The same commands are available from the Arrange menu.

When it comes to machine embroidery, the types of threads you want to reach for are a little different to those used for hand embroidery. Machine embroidery threads come in many different materials, ranging from rayon (the most popular) to silk to polyester.Click the thumbnail to read more or right-click to open the link in a new tab... |
|

| Use Design Colors > Current Color to view the current design color. |
 | Use Design Colors > Threads >> to toggle Threads docker display. Use it to find threads from different charts and change design colors. |
Change colors
The Design Colors toolbar has up to 128 color slots. When you open a new, blank design, it contains a palette of 30 'Hatch colors'. These don't correspond to actual threads but can be matched to the thread chart of your choice. You can change colors at will. See 'Customize your design colors' below. The Threads docker contains potentially hundreds of thread colors - as many as are available within a given thread chart.

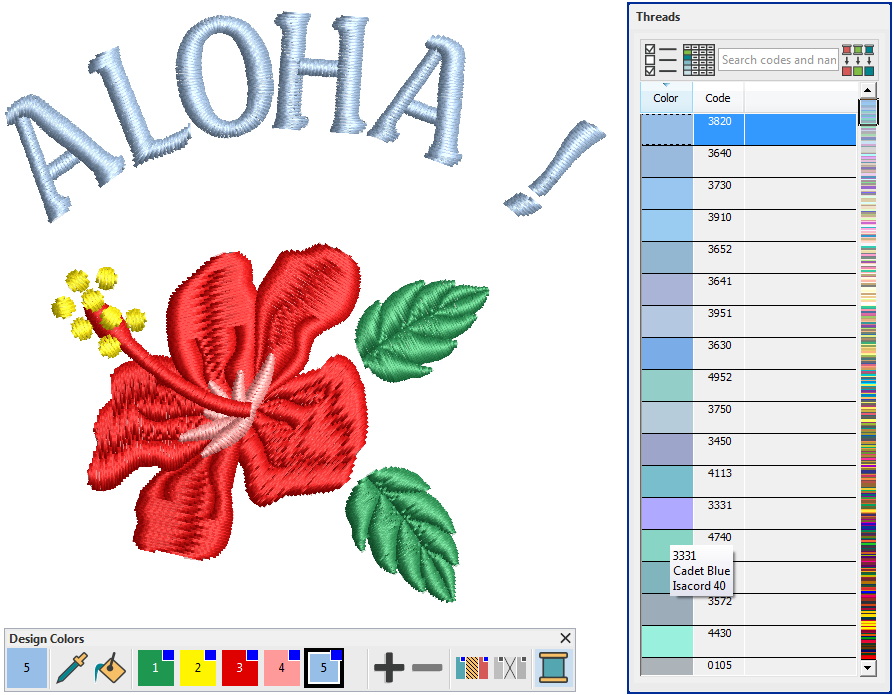
If you open an existing design, colors may have been already assigned to actual threads - e.g. 'Isacord 40', depending on the format you open. Some formats do not have the capability to retain colors - e.g. DST, EXP. Used colors are tagged with a blue dot, as shown.
- Hover the mouse pointer over a color to view its code, name, and chart in the tooltip.

- To change colors, select an object in the design workspace or Sequence docker. Alternatively, use the Sequence docker Color List to select an entire color block. The nearest matching color, based on the currently selected thread chart, is sorted to the top of the Threads docker.

- Scroll through the Threads list and single-click the desired color. The object changes color, the Design Colors toolbar is updated, and the selected color becomes the 'Current Color'.

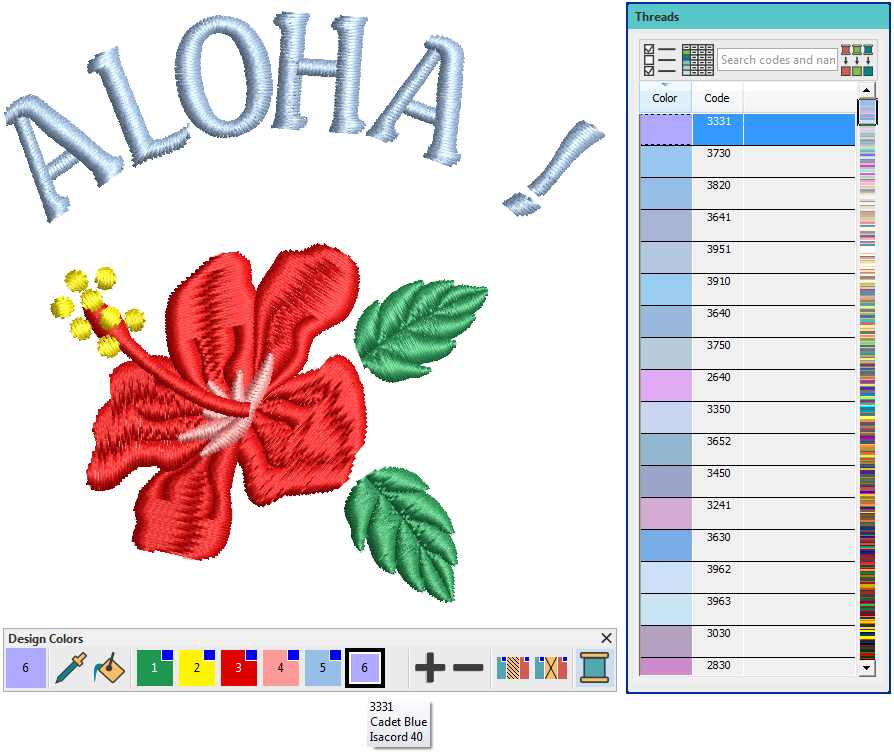
- Let's say you want to change the color of certain objects using an existing color. Click and hold a used color in the Design Colors toolbar while no objects are selected to isolate it in the design workspace.

- Select the objects within the block you want to recolor, and choose a color from the Threads docker with a single-click.

- The new color is added to the Design Colors toolbar as shown. Note that the red color block in the Sequence list has been split in two by the new color. Colors added in this way may need re-sequencing for more efficient stitchout.
 | Use Design Colors > Pick Color to pick up a color from the design window and make it current. |
 | Use Design Colors > Apply Color to apply the current color to embroidery objects. |
Pick & apply existing colors
Pick colors from existing objects using the Pick Color tool. Click on a color in the design. Alternatively, click a color block in the Sequence docker (if available).

Selected colors are transferred to the Design Colors toolbar as the 'current color'. Select the companion tool, 'Apply Color'. Click selected objects in the design to apply the selected color as shown.

 | Use Customize Design > Threads >> to toggle Threads docker display. Use it to find threads from different charts and change design colors. |
| Use Design Colors > Add Design Color to add a color to the end of the design palette. |
| Use Design Colors > Remove Design Color to remove an unused color from the end of the design palette. |
 | Use Design Colors > Hide Unused Colors to show or hide all unused colors in the design palette. |
 | Use Design Colors > Discard Unused Colors to remove all unused colors from the design palette. |
| Use Threads > Select Thread Charts to select the thread charts you currently have available for use. |
| Use Threads / Customize Design > Match All Design Colors to automatically match and assign threads in the thread list to all colors in the Design Color toolbar. |
Customize your design colors
Often you will want to assign your own thread chart to a Design Colors toolbar. For instance:
- If you open a design which uses colors from a thread chart you don’t have, you can match them to a preferred thread chart.
- When you convert vector graphics in Graphics mode, colors are appended to the color palette as RGB values. These can be matched to an actual thread chart.
- If you read a stitch file, color information will be appended to the Design Colors toolbar if available. Again, you can match these colors to an actual thread chart. Not all stitch files retain color information.
The software lets you manage thread colors for each design. Select from a wide range of commercial thread charts. Find and sort specific threads by color code. Replace colors with ones from a different thread chart. Add or remove color slots as required. To customize your design colors...
- Use the + and - buttons to add or remove color slots from your palette. Click the Threads >> button to open the Threads docker.

- Click 'Select Thread Charts' and use the dialog to select your current/preferred thread chart/s. Thread colors from the chart can be assigned manually or automatically to the Design Colors toolbar.

- Select a color in Design Colors toolbar by clicking on the color you want to change. The Threads docker automatically locates the nearest matching thread in the selected thread chart. Find the new color you want to use. Single-click on this new color to change the color in the Design Colors toolbar.

- If you know the exact code or name of the thread you are looking for, key it into the Find Code field. Optionally, sort the thread list by clicking the 'Code' column header. To view complete thread details, click the Show Thread Details button.

- Once you have located the desired thread, Single-click to transfer to the Design Colors toolbar. The selected color becomes the 'Current Color'.
- Alternatively, click the Match All Design Colors button in the Threads docker or Customize Design toolbox. All threads in the current Design Colors toolbar will be substituted automatically by the nearest matching thread colors in the current thread chart.

- Finally, to consolidate the Design Colors toolbar, use the Hide Unused or Remove Unused buttons as preferred. Hide Unused can be toggled on or off if you want to be able to access unused colors at a later stage. Used colors are tagged with blue dots, as shown.

| Use Design Colors > Threads >> to toggle Threads docker display. Use it to find threads from different charts and change design colors. |
Add thread colors to the design palette
Often you simply want to add new thread colors to your Design Colors without changing the color of existing objects.
- Find the new color you want in the Threads docker and double-click.
- The color is appended to the Design Colors in a new color slot. This color is now available for use.
 | Use Customize Design > Cycle Used Colors to cycle through combinations of used colors. Left- or right-click. |
 | Use Customize Design > Color Wheel to test combinations of related colors. |
Change color schemes
The Cycle Used Colors and Color Wheel tools allow you to change entire color schemes. Their main purpose is to create a new ‘colorway’ quickly and easily in order to ‘spice up’ old designs or place them on a different fabric. To change color schemes...
- Use the Cycle Used Colors tool to try out different combinations of the colors within the design.

- Alternatively, use the Color Wheel. This allows you to cycle through many color combinations using preset color schemes including Analogous, Complementary, Harmonious, etc.

- Click and drag the larger ‘base color’ node to try out different combinations within the same colorway. The base color nominally relates to the color of the target fabric and/or the dominant color scheme of the design.
- Click and drag individual color nodes to fine-tune. Use the Brightness control further adjust selected colors.
- To adjust the brightness of the entire design, select the base color node and adjust the Brightness control.
- If you have sufficient colors already defined in the Design Colors toolbar, they will be automatically matched. Alternatively, use the Match All function in the Threads dialog.
 | Use Customize Design > Optimize Color Changes to optimize design by reducing color changes to a minimum, while maintaining color layers. |
Optimize color changes
The Optimize Color Changes feature improves the quality and efficiency of the stitchout by minimizing the number of color changes and trims. All existing overlaps are preserved by the operation. It is good practice to run this command whenever you combine designs.

You will be prompted when optimization is complete. See also Insert designs.

You can also manually resequence objects in the Design Sequence docker by dragging them into your preferred order. You have to be careful in reordering colors, however, that you don't inadvertently cover up objects that are supposed to be stitched on top. It is also good practice to use <J> to apply Closest Join to consecutive objects. See Sequence objects. See also Closest joins.
