
Hoop selection
 Hoops are needed to hold the fabric tight while stitching on your machine. They are available in different sizes. An outline to represent the sewing field of the selected hoop is displayed in the design workspace. This provides a guideline for sizing and positioning designs. You can show or hide the hoop at any time.
Depending on the hoop type you select, the hoop boundary may be displayed as a thin red, blue, or dotted line. If any part of the design lies outside the stitching area, a warning appears when saving. This prevents you from accidentally stitching outside this area and damaging your machine by hitting the hoop with the needle.
If your embroidery is too large or contains a number of designs spaced around an article, you can split it into multiple hoopings. Each one contains an object or group of objects that can be stitched out in a single hooping. See also Multi-hooping.
The screen illustrations in this publication are intended as representations, not exact duplicates of screen layouts generated by the software. The samples used to illustrate software features and capabilities may not be exactly duplicable, depending on your product level.
.
Hoops & templates
When it comes to stitching out, it is important to align the fabric squarely in the hoop, with even pressure on all sides, and fabric patterns and weaves running perpendicular to the hoop. Otherwise, fabric bias allows stretch. This can distort stitching and result in puckering. Each hoop contains vertical and horizontal centering marks on the frames. These help with aligning both the fabric and the design.

Many hoops also come with a clear plastic template overlay. These include alignment lines, with tiny holes which allow you to create positioning marks. Hoop template display can be toggled on or off independently of the hoop itself. Uses in the software...
- Templates include alignment and registration guide markings. These can help you align the design in the hoop.
- Templates can also be printed with alignment and registration markings. This allows you to cut out the printed design and align it in the hoop with the physical template.
 | Click View > Show Hoop to show or hide hoop. Right-click for settings. |
| Click View > Show Hoop Template to show or hide hoop template. |
Select and display hoops
- The Hoop List on the Context toolbar shows which hoop is currently active in the design workspace. The list is automatically filtered according to the selected machine type. Only those hoops supported by that machine or new hoops you have created are available. See also Machine selection.

- Alternatively, right-click the Show Hoop button and choose your machine from the droplist.
- The hoop list is filtered to display compatible hoops. Select a hoop from the droplist.

- Select the smallest hoop which fits the design.
- Activate the Show Hoop button on the View menu to display the current hoop.
Optionally, turn on the hoop template display via the Show Hoop Template toggle. The template may be used to help position your design within the hoop.

You can include the hoop template in the design worksheet, together with alignment and registration guide markings. This allows you to cut out the printed design and align it within the hoop. Use the template markings to align it to physical hoop template. See also Print multi-hooped designs.
- The selected hoop is saved with the design in native EMB file format. When the machine reads the stitch file, the stitching area is limited by the selected hoop type.
| Click View > Show Hoop to show or hide hoop. Right-click for settings. |
Center hoops
By default, the software ensures that your design is always centered in the hoop. However, you can use the manual option to lock the hoop position. This means it won’t automatically center while you are digitizing. If you are creating a single hooping, however, always turn on auto-centering to check that the design will fit within the selected hoop.
Some embroidery machines will always center the design. Set your software to match the exact behavior of the machine.
To set the hoop center, access the Machine & Hoop settings via Software Settings > Embroidery Settings or right-click the Show Hoop icon.

The Hoop Position panel gives you these options:
Option | Purpose |
Automatic centering | The hoop always centers itself around the design center. |
At start needle position | The hoop centers itself around the start needle point. If using this option, you should turn off the ‘Maintain Automatically’ option in Auto Start & End. See also Start & end design. |
Manual | Allows manual placement of the design anywhere in the hoop. Only suitable for machines which allow off-centering of designs within the hoop. |
Set hoop center | Allows an arbitrary hoop center to be created by digitizing a point in the design workspace. If you select this option, click a point in the design workspace where you want to center the hoop. |
If you want to off-center the design, turn off 'Maintain Automatically'. You might do this to set up continuous designs or for special placements such as pockets. Use this with machines that allow you to maintain start and end connectors. With machines that always start in the center of the hoop, make sure automatic centering is set to the start needle position. See also Start & end design.
Hooping is a very important part of machine embroidery as it ensures that your designs are embroidered smoothly and neatly. For more detail about the important aspects of hooping, make sure you check out this blog from one of our digitizing experts.Click the thumbnail to read more or right-click to open the link in a new tab... |  |
 | Use Customize Design / Context > Background and Display Colors to change design background and display colors. |
Background colors
Set the color inside the hoop to match the fabric you intend to stitch out on. You can also set a background color outside the hoop by way of contrast. See also Backgrounds.
- Select Customize Design > Background and Display Colors or right-click the design workspace and select from the popup menu.
To select a color inside the hoop, choose the Solid Color option. This allows you to set separate colors inside and outside the hoop. Select a color from the palette or mix your own.
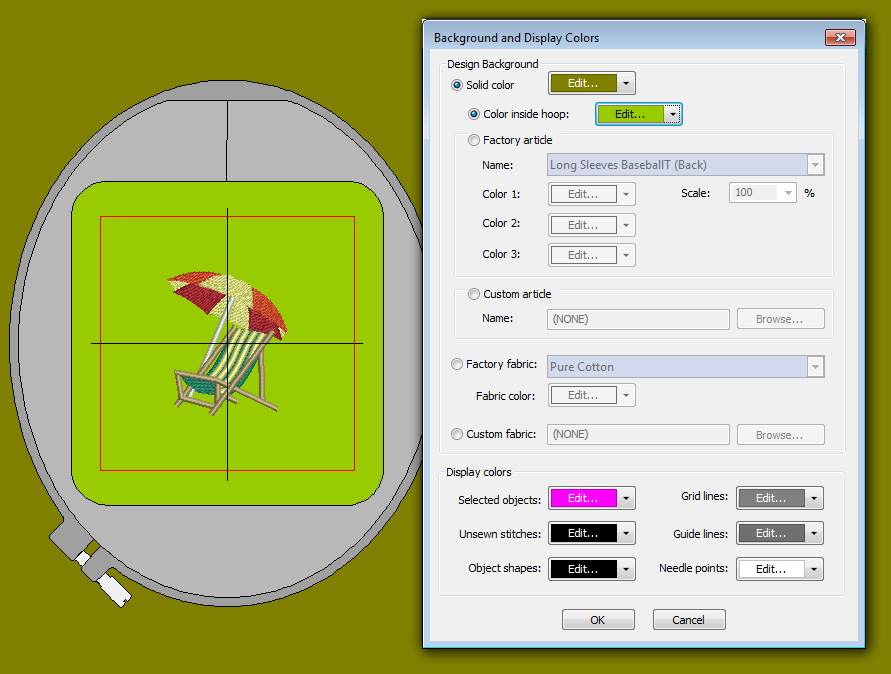
Set the color inside the hoop to match the color of the fabric you intend to stitch out on.
Use Context > Rotate Hoop Left 15° to rotate the first hoop, or the currently selected hoops in multi-hooping mode, in 15° increments to the Left. | |
 | Use Context > Rotate Hoop Right 15° to rotate the first hoop, or the currently selected hoops in multi-hooping mode, in 15° increments to the Right. |
| Use Context > Rotate Hoop to rotate by a specified amount - positive or negative - in degrees. |
Rotate hoops
The Rotate Hoop tool allows you to rotate the hoop for ease of digitizing. The attachment mechanism is indicated, both on screen and printed worksheets. You can thereby tell the orientation of the design with respect to the hoop and decide how to position it. Rotate the current hoop by means of the icon or popup menu.

| Click View > Show Hoop to show or hide hoop. Right-click for settings. |
Custom hoops
The software allows you to define your own hoops and save for later use or associate with a custom machine type. Custom hoops are needed because new hoops become available for sewing machines more frequently than the software is updated. Also some machines include hoop adapters for third-party hoops which need to be defined in the software.
- Right-click the Show Hoop icon to open the dialog.

- Click the 'Create' button in the 'Hoop' panel. Two main types of hoop can be defined or edited in the software – Rectangular and Oval.

The software records the embroidery area of custom hoops to machine file which can then be read by multi-needle machines to determine the stitching area. On the other hand, the stitching area of single-needle machines is determined by the selected hoop type. If the file contains a ‘non-standard’ (custom) hoop code, the hoop size is automatically based on the design size which is used to limit the stitching area.
If you open a EMB file which contains a custom hoop not included in the hoop list, or if the hoop has the same name as a listed one but different type and/or settings, the software creates a new custom hoop with the same characteristics and tags it with a system-generated name.
