Hatch V1.0G Update 2
10 June 2016
This document contains notes on the Hatch V1.0G update. This update - Update 2 - is intended for installation with any released version (already installed) of Hatch 1.0 embroidery software. The Hatch V1.0G update includes the new Knife tool, new optional font packs, as well as miscellaneous improvements to the software. It includes Update 1 in case you missed it. You do not need to install update 1 before you install update 2.
How to update your Hatch embroidery software...
- Connect your computer to the internet.
- Restart Hatch embroidery software.
- If your software is not up to date, you will be prompted to start the update.
- The required file will be downloaded from a secure server.
- Once the download has completed, follow the installation procedure.
- Once completed you will need to restart your PC for all the changes to take affect.
The automatic update overwrites your 'normal' template. If you have made changes to the template, you will need to save them to a custom template - e.g. 'My Template'.
Quality improvements
.
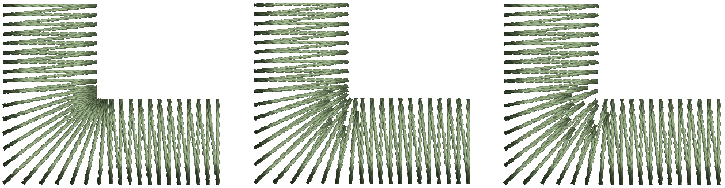
Stitch quality
Stitch shortening is automatically applied to sharp corners to decrease density on the inside edge...
 | Use Appliqué > Digitize Appliqué to create closed appliqué objects with up to four layers of stitching – guide runs, cutting lines, tack stitches, and cover stitches. |
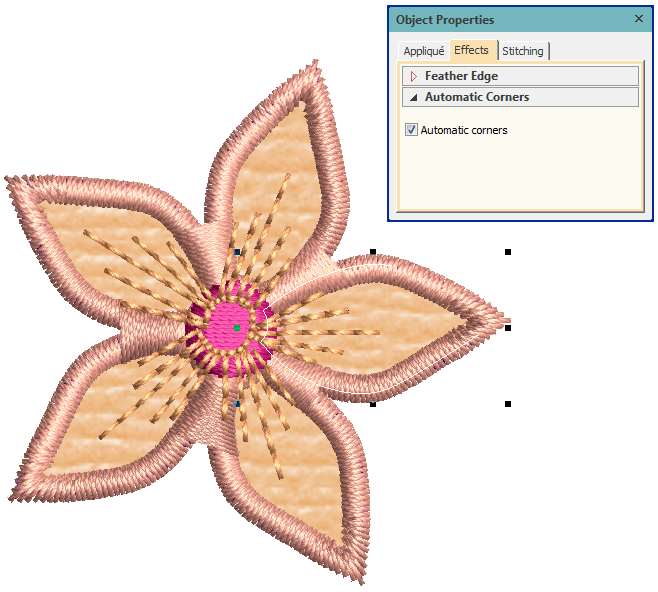
Automatic Corners for appliqué
Automatic Corners have been updated to work with appliqué. Now you have the option of turning it on/off in both appliqué and normal embroidery.
 | Use Digitize / Auto-Digitize / Edit Objects > Branching to automatically sequence selected outlines for efficient stitchout. |
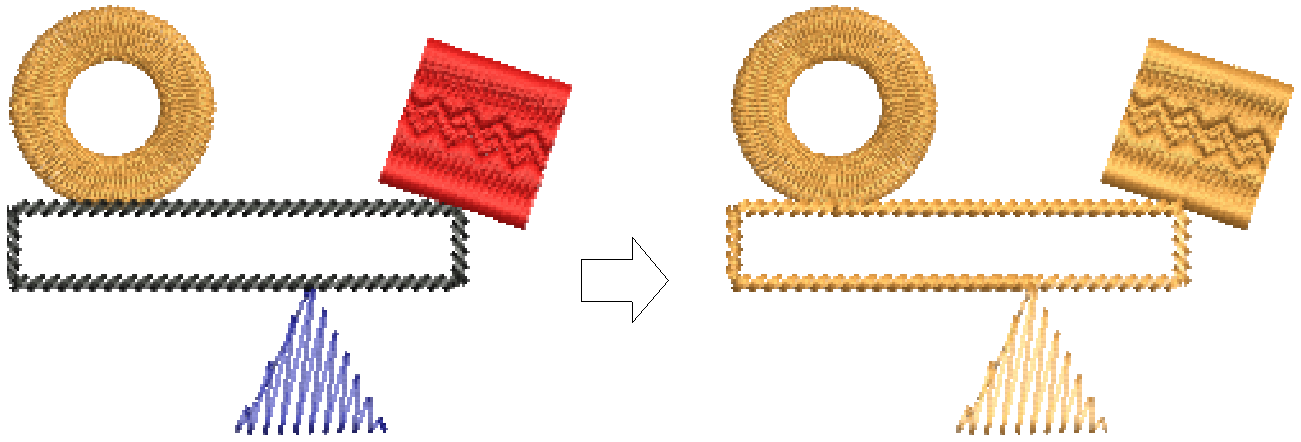
Branching multiple colors
When branching multiple objects with different colors, all branched objects change to the one color. The Design Palette now updates to show the same.
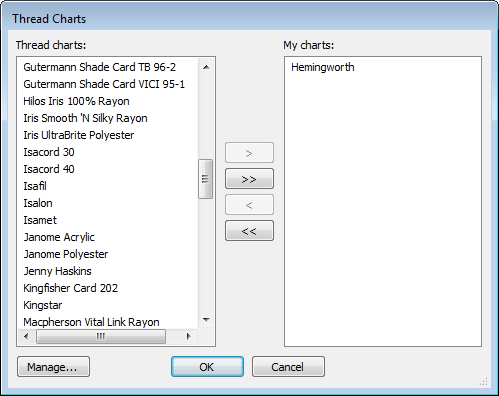
 | Use Design Palette > Change Design Color to show or hide the My Threads docker to find threads from different charts and change design colors. |
Hemingworth thread chart now included
The Hemingworth thread chart is now included in the software.
.
Changing colors for selected objects
There have been a few reported issues to do with changing colors in selected objects. When selecting all objects and applying a single color, not all colors were changed. Some could not be changed after manual digitizing. This issue has been resolved.

Lettering improvements
 | Use Lettering / Monogramming > Lettering to create embroidery lettering onscreen using native embroidery alphabets or TrueType fonts. |
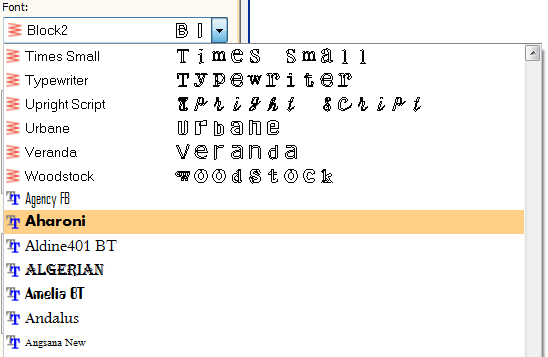
Additional font packs
Two new font packs have been added to Update 2. These are available for purchase as additional font packs.
Font Pack 4: Décor
Font name | Min | Max | ||
| in | mm | in | mm | |
Arial Rounded | 0.32 | 8 | 2.0 | 50 |
Empress | 0.5 | 13 | 2.4 | 60 |
Border Block 2 | 0.5 | 13 | 1.5 | 38 |
Font Pack 5: Special Occasions
Font name | Min | Max | ||
| in | mm | in | mm | |
Helvetica Sm. | 0.2 | 4 | 1.0 | 25 |
City Script | 0.30 | 7 | 2.4 | 60 |
| Dauphin | 0.32 | 8 | 2.0 | 50 |
See also Included fonts.
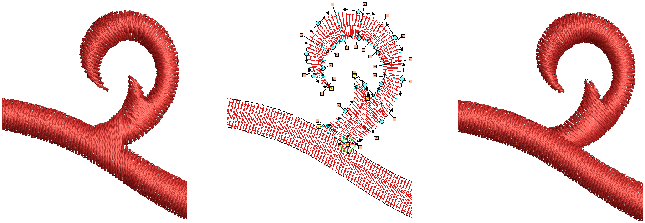
Use Lettering / Monogramming > Knife to cut objects along a digitized line, preserving stitch settings and colors. |
New Knife tool
The Layout Editor level includes a new Knife tool. This tool is used to manually cut shapes into smaller fragments. It is especially useful for editing converted TrueType fonts. When you select a TrueType font in the Font list, it is automatically converted to embroidery lettering.
While TTF conversion produces similar results to digitized embroidery fonts, the quality may not always be quite as high. Narrower serif type fonts generally produce the best results. However, in 99% of cases, conversion problems can be fixed with the Knife tool.
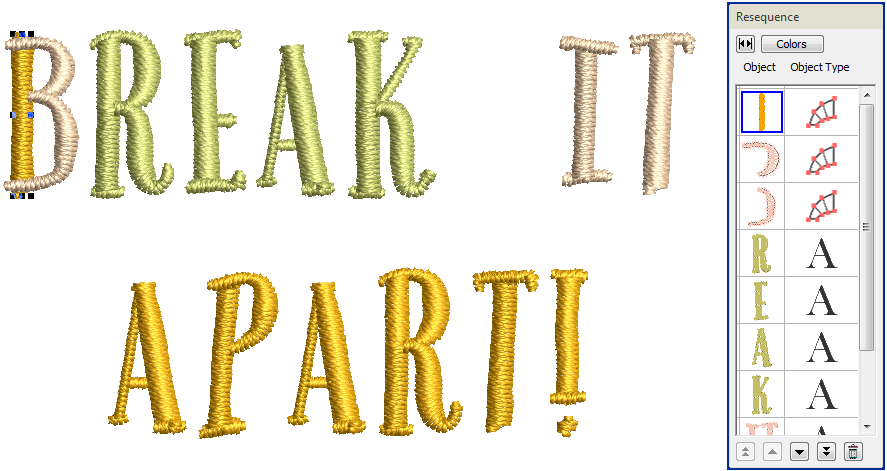
 | Use Edit Objects, Appliqué or Lettering / Monogramming > Break Apart to split composite objects - monograms, appliqués, lettering, etc - into components. Allows each to be edited individually. This tool is also available via Edit menu. |
Applying stitch types to lettering objects using Break Apart tool
When lettering is broken apart into individual objects using the Break Apart tool, different stitch types can now be applied to component objects.
Usability improvements
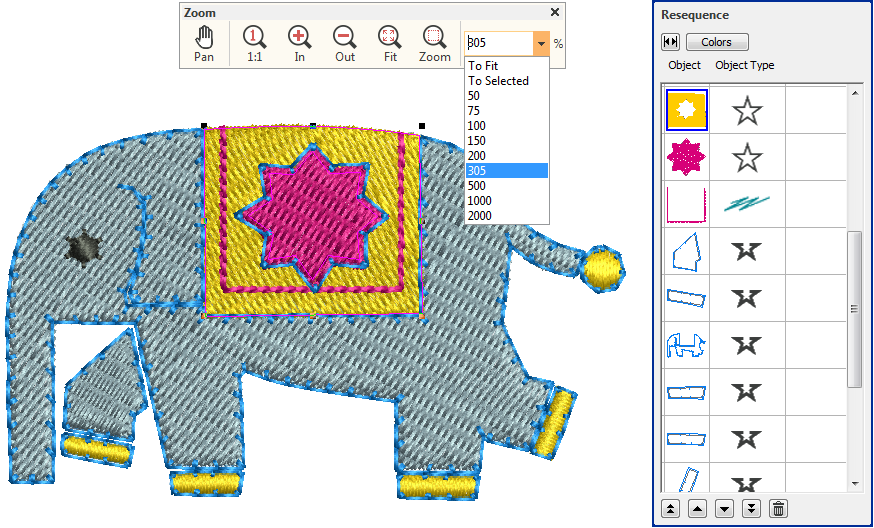
 | Click View > Zoom Scale to display design at a specified scale. |
Resequence docker with changing zoom factors
Resequence docker can now be used after changing zoom factors via the droplist.
Hooping improvements
 | Click View > Show Hoop to show or hide hoop. Right-click for settings. |
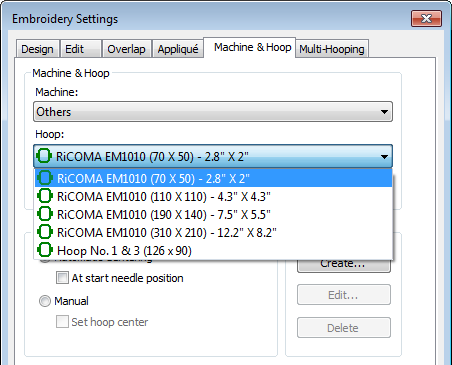
Ricoma EM1010 hoops
Hatch embroidery software (Monogrammer and Basics) is bundled with Ricoma's EM-1010 machines. The Ricoma hoops are now listed under the 'Others' machine type.
.
Offset center lines in custom hoops
Previously the software sometimes displayed incorrectly offset hoop center lines with custom hoops. The center lines were shown offset in newly created hoop until the software was restarted. This issue has been rectified.
Use Context > Rotate Hoop Left 90° to rotate selected hoop in 90° increments to the left. | |
 | Use Context > Rotate Hoop Right 90° to rotate selected hoop in 90° increments to the right. |
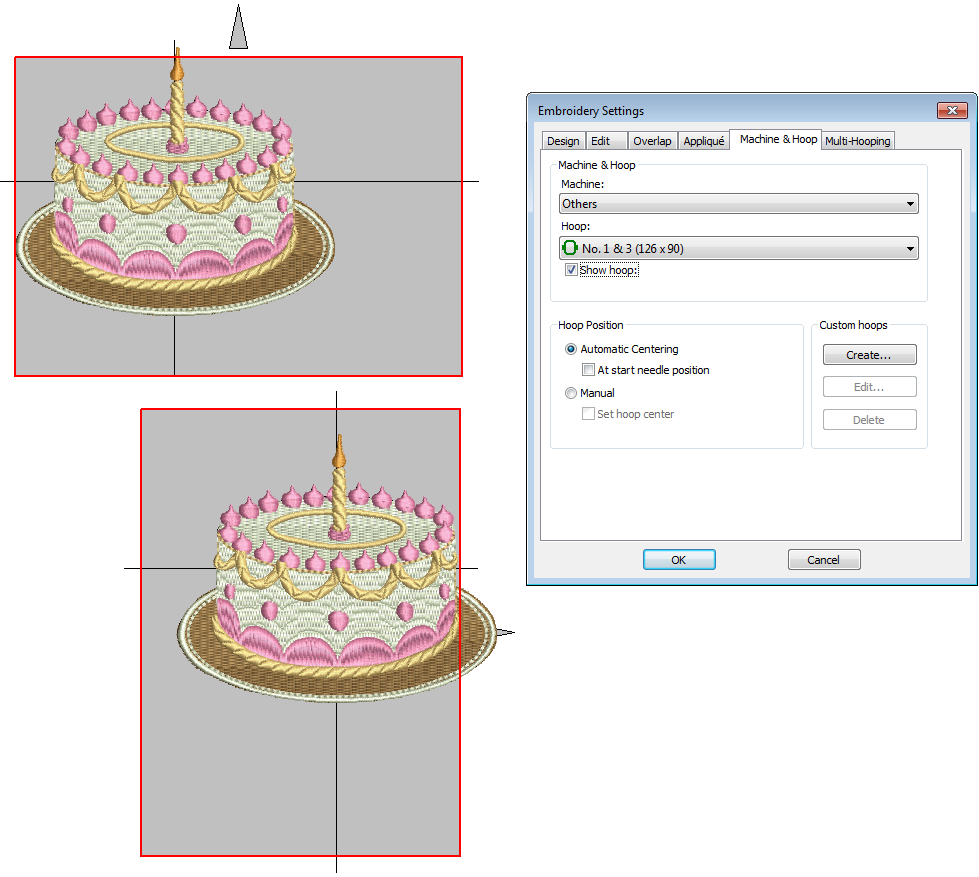
Hoop No. 1 & 3 center lines
Hoop center lines are now redrawn correctly when rotating Hoop No. 1 & 3 (126 x 90).
| Click View > Show Hoop to show or hide hoop. Right-click for settings. |
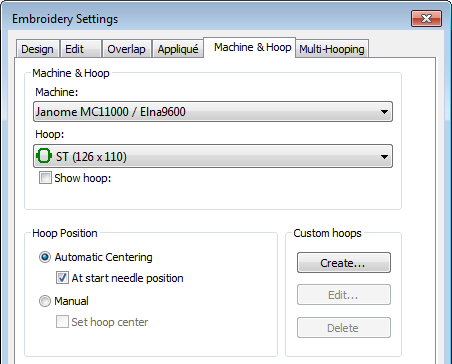
Default hoop position
With previous releases, the default hoop position was always set to Automatic Centering > At start needle position. The software now adjusts the setting according to machine requirements. For instance, Janome requires the 'start needle position' to be activated, 'Others' does not.
Design output improvements
 | Use Manage Designs > Convert Selected Designs to convert the design selected in the embroidery library into different stitch file types. |
Brother PES file format support
Three improvements have been made in support for the Brother PES file format:
- The software now writes to the latest PES file format (Brother PE Design 10).
- Trim codes are now correctly recognized on Brother PR600 machines.
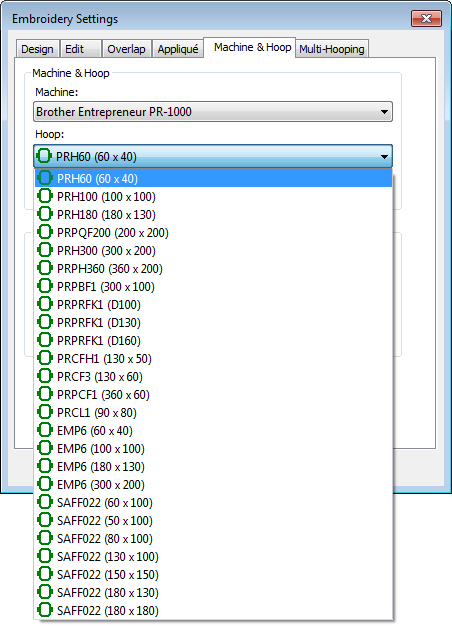
- More Brother hoops have been added to the software.
Use Output Design / Context > Transfer Design to transfer current design to preset design folder. Right-click for settings. |
Transferring designs
System problems have been reported when using the Transfer Design tool with some PCs. This issue has been rectified. The Transfer Designs feature is a shortcut to save your designs to selected machine files. This feature is not designed to transfer designs directly to the machine.
.
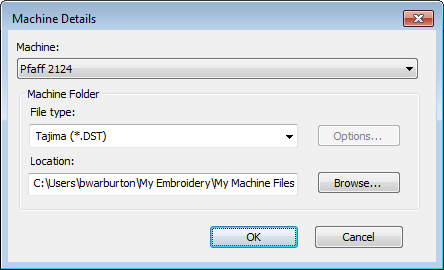
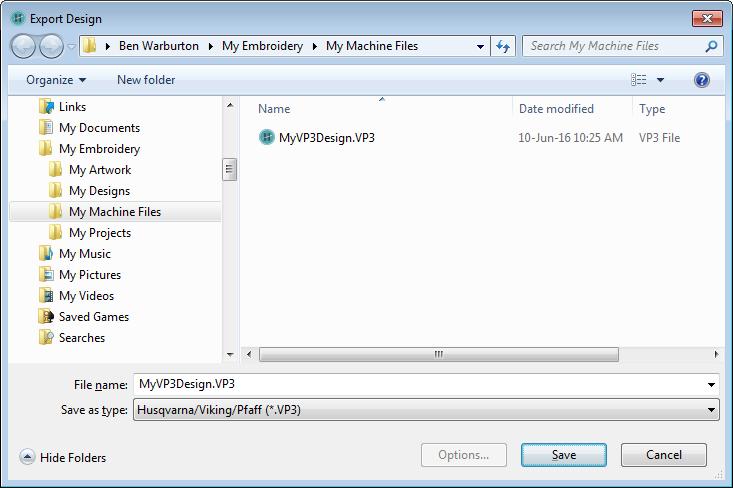
Husqvarna VP3 files in Pfaff machines
Problems have been reported when running Husqvarna VP3 files on Pfaff machines. Designs saved in the software are not trimming correctly in the Pfaff Creative Sensation machine. This issue has been rectified.
.
Loading designs on Janome MC15000
Problems have been reported where designs are offset when loaded on the Janome MC15000 machine. The digitized design appears in the middle of the hoop area in the software but is offset when exported and opened on the machine. This issue has been rectified.
System improvements
.
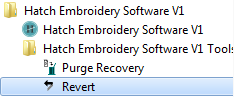
Login errors
Users have reported the below error when signing in:
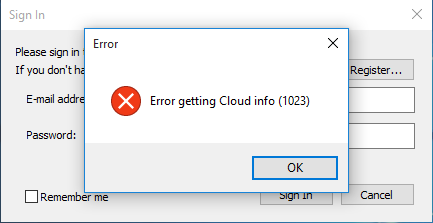
This may happen if you try to use multiple logins on the same PC. If you have already experienced this problem, run the Revert utility. From Update 2 on you should not experience this problem.
.
Running the software without internet connection
There have been intermittent issues to do with running the software without internet connection. These have been resolved. However, note that you will need internet validation every 60 days.
When first logging on, you need to click the 'Remember Me' option in order to use the software offline.
.
Releasing your license for reuse
When you log into Hatch, you use one of your licenses. If you're logged in with 'Remember Me' ticked, you can release the license back to the Cloud by selecting File > Sign Out & Exit Program. (You need internet connection to do this.) This is then available to be used on other machines.